Monday, January 18, 2016

Nest WiFi Smart Thermostat Updates

Nest WiFi Smart Thermostat Updates

Return to the original Nest WIFI unboxing and installation blog.

Updates:
1/17/2016 I found out a few things since installation:
  • Getting the Nest to sense your are in the room: It says that the Nest will light up and show you the current temp when you walk by. It wasn't. I tend to leave protective stick-on covers on displays and there appeared to be one on the Nest. On a whim, I pulled it off and turns out that it was a very small cover that only covered the bottom of the Nest. Once that was removed, it now lights up when you come near it and displays the temp.
  • How to set it to AWAY mode: I was trying to figure out how to get it into Away mode when I was remotely located. On the iPhone app home screen, you will see Home at the top and halfway down, you will see the current temperature in your home. If you press on the Home picture, you now have the choice of pressing Away and that will put it in the Away mode.
1/20/2016 IMPORTANT Information Update:
     Wow, I messed up big time. I made the mistake of installing the thermostat only 2 days before leaving on a business trip. I found out during the first two weeks, it is in "learning" mode to set up the schedule. I knew I was leaving so I set up the schedule manually. It turns out there is a setting that you need to change to tell it NOT to learn but to use the schedule you set up.
    When my wife got home last night, the house temperature was 60 degrees (it was only 12 outside)! She is always cold so to her it felt like below zero! The Nest estimates how long it will take the house to get to the temp you set and it was telling her 2.5 hours!!! I told her it would get to 70 much faster but I am now in the dog house.
     Here are some pictures to show you the dilemma along with some pictures of what you need to do to force it to use the schedule you put in manually.


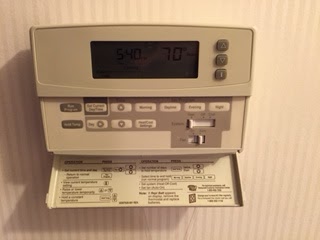
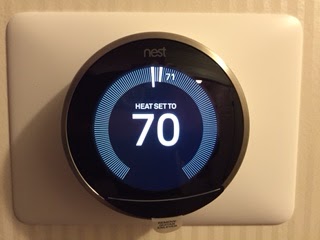
House is currently 62, heat is on and set to 70 and it will take 2+ hours to get to 70

This is the schedule I set up
     The picture shows you the days of the week along with the temperature you set for different times of the day.
     To force the Nest to use your schedule, do the following:


Get to the settings by pressing on the gear in the upper right on any screen that has the gear
     Now do the following:

     You need to get into Nest Sense and shut it off.
This is where you can change settings
     I changed Auto-Away to Off since it was still learning, it went into Away mode when she left the house.
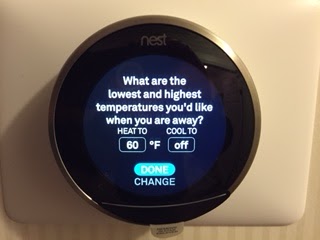
     Set Auto-Schedule to Off. This is the setting that forces the Nest to use your schedule.
     Set Time-to-Temp to Ready. This is the setting that shows you how long it will take to get to the temperature you set.
     Set Early-On to On. This allows the Nest to look at your schedule and turn on the heat early so it is at the temperature you set on the schedule at the time you set. So if you want the house at 70 at 4:45 PM, it will turn on the heat early to get the house to 70 at 4:45 PM. It knows the outside temperature and it bases its turn-on time on the learning it has done meaning, how long did it take to heat before based on the temp outside and the temp inside.
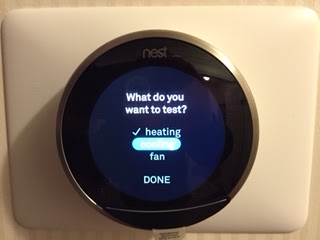
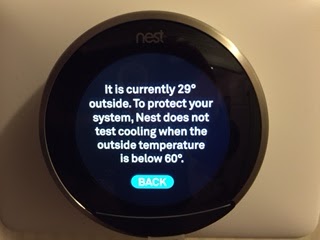
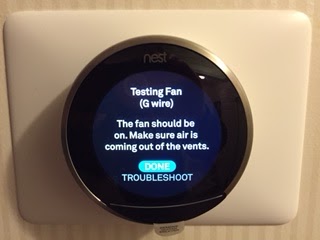
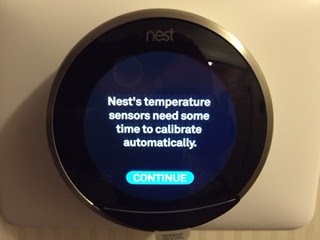
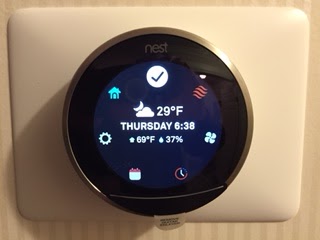
     Other interesting screens:
Energy History shows you how many hours your furnace ran on those days
     To get to Away mode, do the following:
   
     From the Home screen on your phone, Press the Home icon.

Once you press Home, now select Away
Now the Home screen shows you are in Away mode


Thursday, January 14, 2016

Nest Smart Thermostat Installation

Installation of a Nest Smart Thermostat

     The Internet has opened up so much in the way of "smart" technology. I finally moved into the "smart" realm of installing a smart thermostat called a "NEST". This blog will be a box opening to fully installed sequence of events. 
     I researched smart thermostats and the Nest seemed to come out on top so I decided to take the leap and order one. This is the Generation 3 version of Nest. As of January 2016, it runs for around $250 plus tax on Amazon. You can order a Gen 2 version for around $198 but I like to opt for the latest version of anything.
     Updates to this post...

     
Bottom of the box
     Packaging of the nest is AWESOME!!!! I have not seen a product packaged so well in a very long time. If you buy one, you will see what I mean when you open the box.

Seal that you have to break to open the box
      The seal has writing on the side that says to check their web site to make sure it will work with your system before opening the box.

Open the box and there she is!
      This layer 1 of 3. Layer 1 is the Nest. Layer 2 is the documentation packet. Layer 3 is the base plate and under that is the wall plate and electrical outlet cover in case you need them.

Close up of the Nest

Box with layer 1, 2, 3 exposed
      The Nest has a clear plastic cover to protect it when in the box.

Base where the wires attach
      It should be noted here that the Nest comes with a screwdriver with a reversible flat head and Phillips. Two screws are also included to attach the base to the wall and if you need to hide the wall, you snap the Nest base onto the base plate and then use the two screws to attach it.

There are 4 documents included inside the sleeve
     The documentation included is GREAT!!! I'm telling you, all products should come with this amount of easy to read detail. There is a Nest Welcome Home folding out brochure that gives you some clear pictures with explanations that explain a bit on how it works. There is a Nest Learning Thermostat Installation Guide that is very easy to understand. Also included is a one page document that says "The more you Nest, the better it gets."  Then there is a card that says nest Professional Installation and tells you the options if you don't want to install it yourself.
     OK, let's get on with the installation. First you will see pictures of our old programmable thermostat. It worked great but I couldn't adjust the temperature remotely. You can on the nest using their free software on your smart phone from anywhere in the world!

Installation
     The steps are as follows: 
  1. TURN OFF THE CIRCUIT BREAKER TO THE FURNACE
  2. Remove the faceplate from your old thermostat and mark the wires using the included stick-ons that are color coded.
  3. Disconnect the wires (make sure they don't go back inside the wall so wrap them around a pencil temporarily
  4. Remove the old backing plate
  5. Install the new backing plate. Use the integrated level to make sure the base is level.
  6. Connect the marked wires to the marked terminals
  7. Snap the nest thermostat into the base
  8. Turn the circuit breaker back on
  9. The nest should power on with the opening screen
  10. Follow the on screen directions to connect to your WIFI router and set the zip code and other things
  11. Once connected, it will automatically update the software (maybe a few times)
  12. Now follow the pictures below for the screen shots showing you the steps...

Old thermostat before removal

Old thermostat before removal

I used the base plate to cover the previous holes

Take a picture of the wiring before disconnecting any wires

Wires removed and marked

Notice the level at the top. New base plate installed and wired.

Nest snapped into the base
      There is a connector at the bottom of the base and the nest. You need to line those up in order to snap it into the base.

Power on; Choose language
      It should be noted that you rotate the nest to change the selection on the screen and push on the nest to select your choice.

Once language is set, you set up your WIFI connection

This is like a decoder ring used to enter your WIFI password
      You have to twist to move the proper letter to the top. See the ABC to the left of top center? You move that to the top and keep pressing the nest to choose between, lower case, CAPS, numbers and special characters. It takes a little practice but once you get used to it, you will be fine with it.

This screen shows you the WIFI you are connected to

Now it downloads a software update

Download is complete for the nest software update


Now it automatically updates the Nest software

Getting there; it takes a minute


The first of several restarts
      Every time it gets an update, it has to restart. It will restart several times. There is a tiny light at the top that flashes for a bit and then you see it flash with a different color and then it starts displaying what you need to do next.


Screen blanks out during a restart


When you see this, it is almost done restarting

Some of the choices you will see at this point

Whoops! Another software update is needed

It is very user friendly telling you what it's doing

     The following 5 screen shots show you the choices when you rotate the nest.


Screen 2


Screen 4


Enter your home zip code
      In my case, it presented me with the zip code it thought I was in. It is off by one number so I said it was not right. It then let me enter the correct zip code. It uses your location to determine how much time it needs to turn up the heat or bring the temperature down in the summer.


Next you set up your Heating and Cooling settings

It now shows you what wires you connected

Choose Heating next to set up your heating


Choose your type of furnace or heating system

Now tell it you want HEAT if it is winter


Since it is winter now, I left the cooling temp alone


First it prepares your heating


Choose heating first

It will turn your heat on for a bit and you confirm if it worked

It then turns off your heat but it may take a minute for it to turn off

Next I chose to test the cooling

Ha ha. It is smart enough to tell you it won't test the A/C when it's too cold out

Now test to see if it can turn on just the furnace fan

After a bit, you should hear the fan turn on

It takes a minute or two for the fan to turn off


Since mine was cold from being outside, it tells you it needs a bit of time

All systems are checked and ready

Initial setting
      Notice the 71 in small numbers? That is the current temperature in the house. The big numbers are what it's set to.

Rotate the dial to turn the setting up or down

Pressing on the dial brings up a menu
      You can change any setting by pressing on the dial and then rotating it to choose something to change. When it turns the furnace on, the background turns red. When the A/C is on, the background turns blue.
     When you first fire up the nest software on your smart phone, you need to get a code off the thermostat. The phone app explains how to get this off the nest.
     That's it. I love it so far. It says that it will take about a week for it to learn your pattern and temp choices. If anything needs to be updated, I'll update this blog.
     Thanks for visiting...